1. 持久层访问方式
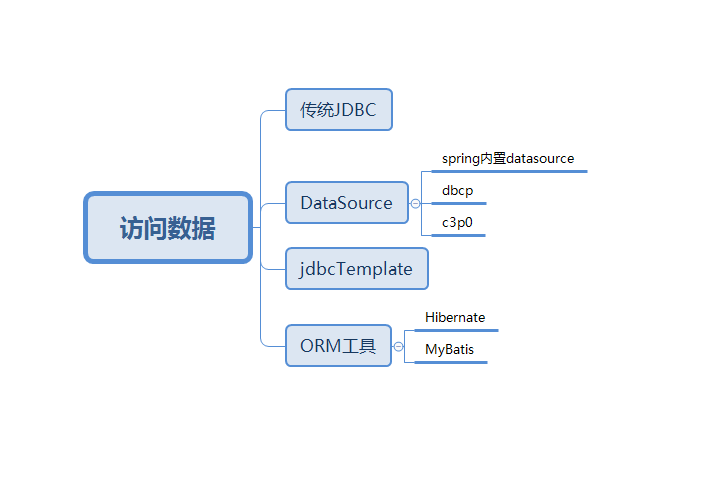
2. JDBC
3. JDBCTemplete
3.1 原始jdbcTemplete
1 | DriverManagerDataSource dataSource = new DriverManagerDataSource(); |
3.2 Spring开发jdbcTemplete
设置Bean
1
2
3
4
5
6
7
8
9
10
11
12
13
14<bean id="dao" class="com.topvision.daotest.Dao">
<property name="jdbcTemplate" ref="jdbcTemplate" />
</bean>
<bean id="jdbcTemplate" class="org.springframework.jdbc.core.JdbcTemplate">
<property name="dataSource" ref="dataSource" />
</bean>
<bean id="dataSource" class="org.springframework.jdbc.datasource.DriverManagerDataSource">
<property name="driverClassName" value="com.mysql.jdbc.Driver" />
<property name="url" value="jdbc:mysql://localhost:3306/springdb" />
<property name="username" value="root" />
<property name="password" value="xiaoyue*AZ2V65" />
</bean>编写dao层测试类
1
2
3
4
5
6
public void Demo1() {
ClassPathXmlApplicationContext ctx = new ClassPathXmlApplicationContext("jdbcTemplete.xml");
JdbcTemplate jdbcTemplate = (JdbcTemplate) ctx.getBean("jdbcTemplate");
jdbcTemplate.execute("insert into student values(5,'23423',24)");
}或者注解式
开启注解扫描
1
<context:component-scan base-package="com.topvision.daotest"/>
去掉dao层的bean,即如下配置
1
2
3<bean id="dao" class="com.topvision.daotest.Dao">
<property name="jdbcTemplate" ref="jdbcTemplate" />
</bean>
编写测试类
1
2
3
4
5
6
7
8
9
10
11
12
13
14
15
(SpringJUnit4ClassRunner.class)
(locations="classpath:jdbcTemplete.xml")
public class Dao {
private JdbcTemplate jdbcTemplate;
public void setJdbcTemplate(JdbcTemplate jdbcTemplate) {
this.jdbcTemplate = jdbcTemplate;
}
public void Demo2() {
jdbcTemplate.execute("insert into student values(8,'王五',25)");
}
}
3. jdbcDaoSupport
JdbcDaoSupport是JDBC数据访问对象的超类,其实它使用的还是jdbcTemplete,不过需要DI依赖注入dataSource或者jdbcTemplete.
3.1 xml方式
xml配置文件
1
2
3
4
5
6
7
8
9
10
11
12
13
14
15<bean id="jdbcDaoSupportTest" class="com.topvision.daotest.JDBCDaoSupportTest">
<bean id="jdbcDaoSupportTest" class="com.topvision.daotest.JDBCDaoSupportTest">
<!-- 必须为继承JdbcDaoSupport的类注入JdbcTemplate,变量名为jdbcTemplate -->
<!-- <property name="jdbcTemplate" ref="jdbcTemplate"/> -->
<!-- 还可以注入DataSource对象,由JdbcDaoSupport自动创建JdbcTemplate对象 -->
<property name="dataSource" ref="dataSource" />
</bean>
<bean id="dataSource"
class="org.springframework.jdbc.datasource.DriverManagerDataSource">
<property name="driverClassName" value="com.mysql.jdbc.Driver" />
<property name="url" value="jdbc:mysql://localhost:3306/springdb" />
<property name="username" value="root" />
<property name="password" value="*****" />
</bean>测试类
1
2
3
4
5
6
7
8
9
10
11
12
13
14public class JDBCDaoSupportTest extends JdbcDaoSupport{
private static ClassPathXmlApplicationContext ctx;
public void Demo2() {
ctx = new ClassPathXmlApplicationContext("jdbcDaoSupport.xml");
JDBCDaoSupportTest bean = (JDBCDaoSupportTest) ctx.getBean("jdbcDaoSupportTest");
JdbcTemplate template = bean.getJdbcTemplate();
String sql = "select name from student where id = ?";
String name = template.queryForObject(sql, String.class,1);
System.out.println(name);
}
}
3.2 注解方式
xml配置
1
2
3
4
5
6
7<bean id="dataSource"
class="org.springframework.jdbc.datasource.DriverManagerDataSource">
<property name="driverClassName" value="com.mysql.jdbc.Driver" />
<property name="url" value="jdbc:mysql://localhost:3306/springdb" />
<property name="username" value="root" />
<property name="password" value="*****" />
</bean>
- 测试类
1
2
3
4
5
6
7
8
9
10
11
12
13
14
15
16
17
18public class JDBCDaoSupportTest extends JdbcDaoSupport{
private DataSource dataSource;
private void init() {
setDataSource(dataSource);
}
public void Demo1() {
JdbcTemplate template = this.getJdbcTemplate();
String sql = "select name from student where id = ?";
String name = template.queryForObject(sql, String.class,1);
System.out.println(name);
}
}
注入dataSource注意事项
查看jdbcDaoSupport源码,可以注入dataSource或者注入jdbcTemplete
注入方法有两种:构造方法中注入:
1
2
3
4
UserVODaoImpl(DataSource dataSource) {
setDataSource(dataSource);
}实例化前注入
1
2
3
4
5
6
7
private DataSource dataSource;
private void init() {
setDataSource(dataSource);
}
4. Hibernate
5. Mybatis
6. DataSource
6.1 Spring内置DriverManagerDataSource
资源包
1
2
3
4
5
6
7
8
9
10
11
12
13
14
15<dependency>
<groupId>org.springframework</groupId>
<artifactId>spring-jdbc</artifactId>
</dependency>
```
2. 配置项
```xml
<bean id="dataSource" class="org.springframework.jdbc.datasource.DriverManagerDataSource">
<property name="driverClassName" value="com.mysql.jdbc.Driver" />
<property name="url" value="jdbc:mysql://localhost:3306/springdb"/>
<property name="username" value="root" />
<property name="password" value="****" />
</bean>
6.2 DBCP
资源包
1
2
3
4
5
6
7
8
9
10
11
12
13
14
15
16
17
18
19
20
21
22<dependency>
<groupId>org.apache.commons</groupId>
<artifactId>com.springsource.org.apache.commons.dbcp</artifactId>
<version>1.2.2.osgi</version>
</dependency>
<dependency>
<groupId>org.apache.commons</groupId>
<artifactId>com.springsource.org.apache.commons.pool</artifactId>
<version>1.5.3</version>
</dependency>
```
4. 配置项
```xml
<bean id="dataSource" class="org.apache.commons.dbcp.BasicDataSource">
<property name="driverClassName" value="com.mysql.jdbc.Driver" />
<property name="url" value="jdbc:mysql://localhost:3306/springdb" />
<property name="username" value="root" />
<property name="password" value="*****" />
</bean>
6.3 C3P0
资源包
1
2
3
4
5
6
7
8
9
10
11
12
13
14
15
16
17<dependency>
<groupId>com.mchange.c3p0</groupId>
<artifactId>com.springsource.com.mchange.v2.c3p0</artifactId>
<version>0.9.1.2</version>
</dependency>
```
6. 配置项
```xml
<bean id="dataSource3" class="com.mchange.v2.c3p0.ComboPooledDataSource">
<property name="driverClass" value="${driverClass}" />
<property name="jdbcUrl" value="${url}" />
<property name="user" value="${jdbc_username}" />
<property name="password" value="${password}" />
</bean>
6.4 外部properties输入参数
编写properties文件(jdbc.properties)
1
2
3
4
driverClass=com.mysql.jdbc.Driver
url=jdbc:mysql://localhost:3306/springdb
jdbc_username=root
password=*****在spring配置文件中扫描properties
方式一:可用*匹配加载多个
1
<context:property-placeholder location="classpath:jdbc.properties"/>
方式二:一个property对应一个文件
1
2
3
4<bean class="org.springframework.beans.factory.config.PropertyPlaceholdeConfigurer">
<property name="location" value="classpath:jdbc.properties" />
<property name="location" value="classpath:dsafgusd" />
</bean>用&{key}的方式引入
1 | <bean id="dataSource3" class="com.mchange.v2.c3p0.ComboPooledDataSource"> |