MyBatis 本是apache的一个开源项目iBatis, 2010年这个项目由apache software foundation 迁移到了google code,并且改名为MyBatis,实质上Mybatis对ibatis进行一些改进。
MyBatis是一个优秀的持久层框架,它对jdbc的操作数据库的过程进行封装,使开发者只需要关注 SQL 本身,而不需要花费精力去处理例如注册驱动、创建connection、创建statement、手动设置参数、结果集检索等jdbc繁杂的过程代码。
Mybatis通过xml或注解的方式将要执行的各种statement(statement、preparedStatemnt、CallableStatement)配置起来,并通过java对象和statement中的sql进行映射生成最终执行的sql语句,最后由mybatis框架执行sql并将结果映射成java对象并返回。
1、资源下载
mybaits的代码由github.com管理,地址:https://github.com/mybatis/mybatis-3/releases
要使用 MyBatis, 只需将 mybatis-x.x.x.jar 文件置于 classpath 中即可。
如果使用 Maven 来构建项目,则需将下面的 dependency 代码置于 pom.xml 文件中:1
2
3
4
5<dependency>
<groupId>org.mybatis</groupId>
<artifactId>mybatis</artifactId>
<version>x.x.x</version>
</dependency>
2、架构
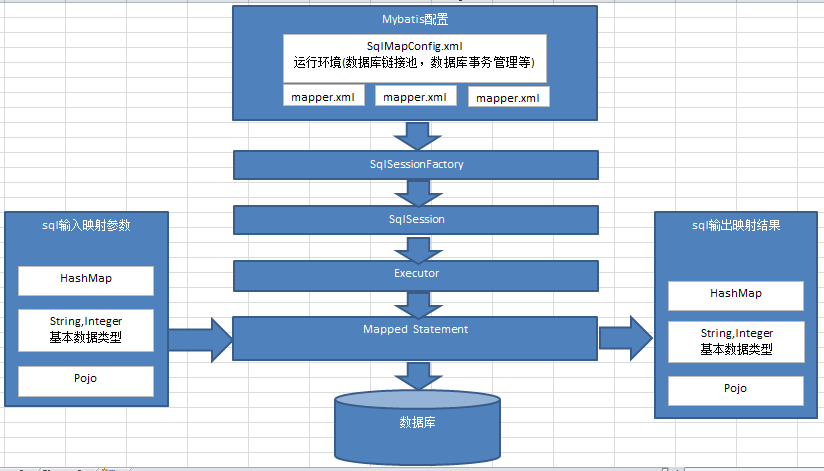
- SqlMapConfig.xml
mybatis的全局配置文件,配置了运行环境等信息。mapper.xml即映射文件,里面配置了操作数据库的sql语句,该类文件需要在SqlMapConfig.xml中加载。 - SqlSessionFactory
通过mybatis环境等配置信息构造SqlSessionFactory即会话工厂 - SqlSession
由会话工厂创建sqlSession即会话,操作数据库需要通过sqlSession进行 - Executor
mybatis底层自定义了Executor执行器接口操作数据库,Executor接口有两个实现,一个是基本执行器、一个是缓存执行器。 - Mapper Statement
mybatis底层封装对象,它包装了mybatis配置信息及sql映射信息等。mapper.xml文件中一个sql对应一个Mapped Statement对象,sql的id即是Mapped statement的id。
Mapped Statement对sql执行输入参数进行定义,包括HashMap、基本类型、pojo,Executor通过Mapped Statement在执行sql前将输入的java对象映射至sql中,输入参数映射就是jdbc编程中对preparedStatement设置参数。
Mapped Statement对sql执行输出结果进行定义,包括HashMap、基本类型、pojo,Executor通过Mapped Statement在执行sql后将输出结果映射至java对象中,输出结果映射过程相当于jdbc编程中对结果的解析处理过程。
3、特点

上边使用jdbc的原始方法(未经封装)实现了查询数据库表记录的操作。
JDBC编程问题总结:
1、 数据库链接创建、释放频繁造成系统资源浪费从而影响系统性能,如果使用数据库链接池可解决此问题。
2、 Sql语句在代码中硬编码,造成代码不易维护,实际应用sql变化的可能较大,sql变动需要改变java代码。
解决:将Sql语句配置在XXXXmapper.xml文件中与java代码分离。
3、 使用preparedStatement向占有位符号传参数存在硬编码,因为sql语句的where条件不一定,可能多也可能少,修改sql还要修改代码,系统不易维护。
解决:Mybatis自动将java对象映射至sql语句,通过statement中的parameterType定义输入参数的类型。
4、 对结果集解析存在硬编码(查询列名),sql变化导致解析代码变化,系统不易维护,如果能将数据库记录封装成pojo对象解析比较方便。
解决:Mybatis自动将sql执行结果映射至java对象,通过statement中的resultType定义输出结果的类型。
4、入门程序搭建
需求:查询图书id查询图书信息
创建数据库,新建book表:1
2
3
4
5
6
7
8
9
10
11CREATE TABLE `book` (
`book_id` bigint(20) NOT NULL AUTO_INCREMENT COMMENT '图书ID',
`name` varchar(100) NOT NULL COMMENT '图书名称',
`number` int(11) NOT NULL COMMENT '馆藏数量',
PRIMARY KEY (`book_id`)
) ENGINE=InnoDB AUTO_INCREMENT=1004 DEFAULT CHARSET=utf8 COMMENT='图书表'
INSERT INTO `book` VALUES ('1000', 'Java程序设计', '10');
INSERT INTO `book` VALUES ('1001', '数据结构', '10');
INSERT INTO `book` VALUES ('1002', '设计模式', '10');
INSERT INTO `book` VALUES ('1003', '编译原理', '10');
4.1、maven创建java工程
省略
4.2、引入依赖
加入mybatis核心包、依赖包、数据驱动包。完整的pom配置如下:1
2
3
4
5
6
7
8
9
10
11
12
13
14
15
16
17
18
19
20
21
22
23
24
25
26
27
28
29
30
31
32
33
34
35
36
37
38
39
40
41
42
43
44
45
46
47
48
49
50
51
52
53
54
55
56
57
58
59
60
61
62
63
64
65
66
67
68
69
70
71
72
73
74
75
76
77
78
79
80
81
82
83
84
85
86
87
88
89
90
91
92
93
94<project xmlns="http://maven.apache.org/POM/4.0.0" xmlns:xsi="http://www.w3.org/2001/XMLSchema-instance"
xsi:schemaLocation="http://maven.apache.org/POM/4.0.0 http://maven.apache.org/xsd/maven-4.0.0.xsd">
<modelVersion>4.0.0</modelVersion>
<groupId>com.topvision.maven</groupId>
<artifactId>mybatis</artifactId>
<version>0.0.1-SNAPSHOT</version>
<packaging>jar</packaging>
<name>mybatis</name>
<url>http://maven.apache.org</url>
<properties>
<project.build.sourceEncoding>UTF-8</project.build.sourceEncoding>
<mybatis.version>3.4.5</mybatis.version>
</properties>
<dependencyManagement>
<dependencies>
<dependency>
<groupId>org.mybatis</groupId>
<artifactId>mybatis</artifactId>
<version>${mybatis.version}</version>
</dependency>
</dependencies>
</dependencyManagement>
<dependencies>
<!-- mybatis -->
<dependency>
<groupId>org.mybatis</groupId>
<artifactId>mybatis</artifactId>
</dependency>
<dependency>
<groupId>org.mybatis</groupId>
<artifactId>mybatis-spring</artifactId>
<version>1.3.1</version>
</dependency>
<!-- mysql驱动 -->
<dependency>
<groupId>mysql</groupId>
<artifactId>mysql-connector-java</artifactId>
<version>5.1.6</version>
<scope>runtime</scope>
</dependency>
<!-- c3p0 -->
<dependency>
<groupId>c3p0</groupId>
<artifactId>c3p0</artifactId>
<version>0.9.1.2</version>
</dependency>
<!-- slf4j -->
<dependency>
<groupId>org.slf4j</groupId>
<artifactId>slf4j-api</artifactId>
<version>1.7.5</version>
</dependency>
<dependency>
<groupId>org.slf4j</groupId>
<artifactId>slf4j-log4j12</artifactId>
<version>1.7.12</version>
</dependency>
<dependency>
<groupId>log4j</groupId>
<artifactId>log4j</artifactId>
<version>1.2.17</version>
</dependency>
<!-- junit -->
<dependency>
<groupId>junit</groupId>
<artifactId>junit</artifactId>
<version>4.9</version>
<scope>test</scope>
</dependency>
</dependencies>
<build>
<plugins>
<plugin>
<groupId>org.apache.maven.plugins</groupId>
<artifactId>maven-compiler-plugin</artifactId>
<configuration>
<source>1.8</source>
<target>1.8</target>
<encoding>UTF-8</encoding>
</configuration>
</plugin>
</plugins>
<finalName>mybatis</finalName>
</build>
</project>
4.3、log4j.properties
在classpath下加入日志配置:1
2
3
4
5
6
7
8
9
10
11
12
13
14
15
16
17
18
19#定义LOG输出级别
log4j.rootLogger=DEBUG,Console,File
#定义日志输出目的地为控制台
log4j.appender.Console=org.apache.log4j.ConsoleAppender
log4j.appender.Console.Target=System.out
#可以灵活地指定日志输出格式,下面一行是指定具体的格式
log4j.appender.Console.layout = org.apache.log4j.PatternLayout
log4j.appender.Console.layout.ConversionPattern=[%c] - %m%n
#文件大小到达指定尺寸的时候产生一个新的文件
log4j.appender.File = org.apache.log4j.RollingFileAppender
#指定输出目录
log4j.appender.File.File = logs/ssm.log
#定义文件最大大小
log4j.appender.File.MaxFileSize = 10MB
#输出所有日志,如果换成DEBUG表示输出DEBUG以上级别日志
log4j.appender.File.Threshold = ALL
log4j.appender.File.layout = org.apache.log4j.PatternLayout
log4j.appender.File.layout.ConversionPattern =[%p] [%d{yyyy-MM-dd HH\:mm\:ss}][%c]%m%n
4.4、jdbc.properties
在classpath下新建数据库连接文件。
1 | jdbc.driverClass = com.mysql.jdbc.Driver |
4.4、SqlMapConfig.xml
在classpath下新建SqlMapConfig.xml文件,配置mybatis运行环境。
1 | <?xml version="1.0" encoding="UTF-8" ?> |
SqlMapConfig.xml是mybatis核心配置文件,上边文件的配置内容为数据源、事务管理。
4.5、编写Po类
Po类作为mybatis进行sql映射使用,po类通常与数据库表对应,Book.java如下:1
2
3
4
5
6public class Book {
private long bookId;// 图书ID
private String name;// 图书名称
private int number;// 馆藏数量
...
4.6、编写映射文件(sql)
在classpath下的sqlmap目录下创建sql映射文件Book.xml:
1 | <?xml version="1.0" encoding="UTF-8" ?> |
namespace :命名空间,用于隔离sql语句,后面会讲另一层非常重要的作用。
parameterType:定义输入到sql中的映射类型,#{id}表示使用preparedstatement设置占位符号并将输入变量id传到sql。
resultType:定义结果映射类型。
4.7、加载映射文件
在SqlMapConfig.xml中加载映射文件Book.xml
1 | <mappers> |
4.8、测试
1 | public class BookDaoTest { |
至此,若能查询出结果,则工程搭建成功。